I definitely want to create some videos in the future, however!
My most requested commissions are custom pet rabbit portraits. These are small sculptures, usually measuring 2-3 inches long and about 1 inch tall.
As always, I recommend using Premo or Fimo. (I've never actually tried Fimo, but I've heard it has similar properties.)
You will also need aluminum foil.
...And a few basic tools. These are by far my favorites!
From left to right: basic wooden sculpting tool, craft knife, pin and a small metal ball stylus.
I also use a sharp angled carving tool at times, especially for shaping the inner ears.
You start with a well-conditioned ball of clay....
... and roll it out into a cylinder. This will become the body of your rabbit, so make it about the size you wish your sculpture to be.
Press it into your work surface and shape it about how you want it to be positioned. This rabbit will be lying down.
Next, take two equal-sized pieces and roll them out for the front legs.
Place them where you want them, and smooth them underneath to attach.
Now for the hind legs. Tear off two slightly larger pieces and begin to shape them.
Arrange.
I can see here that this piece needs to come off for it to look right.
There, that's better.
Smooth edges to attach.
Begin to press and shape. By the way, I use a LOT of photo references for my pieces. I use photographs of the animals I am doing portraits for as well as plenty of photos on the internet. Google search is your friend!
Now it's starting to look like a rabbit!
Now it's time to work on proportions. The front legs are a bit too long.
A little trim.
And reshape.
Now for the head. Tear off a piece about the size you think you need.
Shape it a bit and see if the proportions look right.
I position the head about how I want it, and take a look at the overall proportions. Needs a little trimming right here.
I begin to add a few basic details to the face.
I press down to shape the back and belly, as well as make the underside nice and flat.
Now I remove the head so I can work on both parts separately.
Rolling the sides of the ball stylus over the edges helps to attach and smooth.
I shape the head a bit more.
Now to attach the head. It wouldn't look right to just plunk it on top. When a rabbit is at rest, their neck sort of collapses into their shoulders. So to make the head more recessed, I cut a hole.
Gently seal the edges of the head with the stylus.
I use the knife to cut in the nose and mouth.
I also round out and build up the nose and lip area using tiny balls of clay.
Now for the ears. Taking the smallest end of my ball stylus, I poke holes where the ears are going to be.
Tear off a small square of aluminum foil, about the length you want the ears to be (it helps to hold it up next to the head).
Roll it up tightly. You want it thin, but still strong enough to keep the clay from drooping.
Cut into equal lengths.
Twist one end to a point and insert into the hole.
Repeat for the other side.
Flatten out a small piece of clay and press it onto the foil.
Begin to shape, adding and removing clay as necessary.
Build up the backs of the ears.

Use the carving tool to gently hollow out the inside of the ear, being careful not to expose the foil too much (like I did here).
Use the ball stylus to smooth and shape until they look about right. (Ears take a lot of practice.)

I use the knife to cut in the toes. I do a little reshaping, but most of that will come later when I ad the fur details.
Now for the eyes. Roll out a ball of clay and half it with the knife to get two equal sized balls. Press into the eye sockets.
Alternately, you can bake balls of clay and press them in (I've got to try that sometime, but for now I'm going to keep doing it the hard way.)
Roll out thin snakes to fill in around the eyes.

Use the ball stylus to apply and shape.
Getting there!
(I apologize for the change in background. I had to switch locations. Now you get to see my hideous work table!)
Now we arrive at this point. I decided he was too long in the midsection.
So I did a little surgery to shorten him up.
Now for the fur! I very carefully use a pin to lightly carve hair detail on the face. Be sure to follow the natural hair direction of the animal.
I use the ball stylus for more deeply furred regions.
And then go over them with a pin.
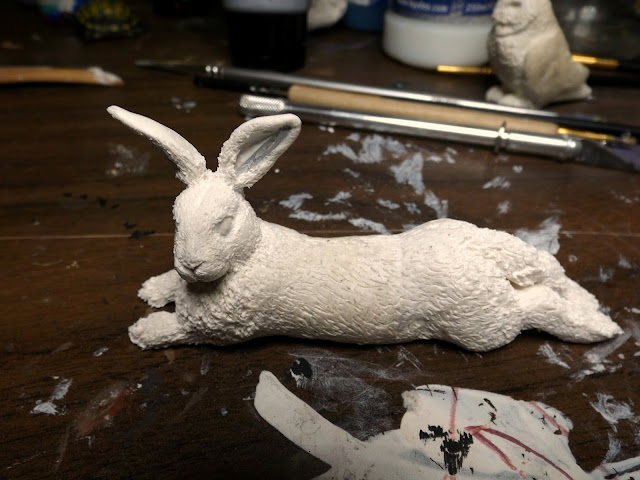
Take your time, and carefully add the rest of the hair. Look it over one last time to make any last minute adjustments, and then into the oven he goes!
I baked this guy for 2 hours on 275 F, letting him cool in the oven overnight.
All done! White clay gets filthy, but I never worry about it because it will all get covered with paint.
Join me next time for an overview of how I approach painting my rabbits.
I hope this tutorial has been helpful and inspiring to you. Be sure to leave any questions, comments or suggestions below.
Thanks for joining me!


No comments:
Post a Comment