Showing posts with label wild animals. Show all posts

Thursday, June 23, 2016

Wolf Sculpture Process


I am a HUGE nature geek. I am fascinated by animals of all shapes and sizes, but the wolf holds a special place in my heart.

So I just had to sculpt one. 

This was my first attempt, and I think it turned out pretty good, but I would like to try again with my added experience and a different approach to technique.

Here's how I went about it....


As always, I recommend Premo!  The photos are pretty self-explanatory, but I started with the head. 


I continued to layer clay and fill it out to make it the right shape (I used a ton of photo references).


Once it looked about right, I etched in a few basic details and baked to preserve my work.

 I then got to work on the rest of the body.


I began adding the body, and created the legs using aluminum foil.


As always, my clay gets extra filthy. I guess it doesn't really matter since I paint my pieces, but I do find it distracting. I may need to switch to gray so I don't notice it as much.


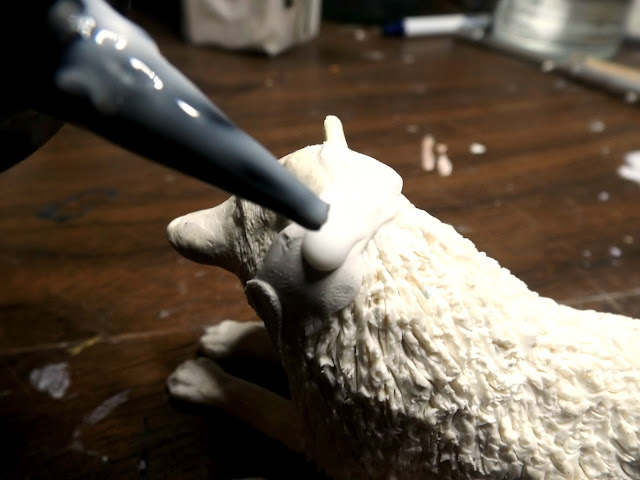
I skipped a few steps in pictures, but here is where I began work on the fur.

I experimented with different techniques until I finally settled on this. I wasn't 100% happy with it to be honest, but it looked alright.


I wet the fresh clay down with liquid sculpey and carved out the shapes with a curved sculpting tool.


The fur was a little to woolly and blocky for my taste, but I think it looked okay once the paint was on.

I decided to go with a less obvious choice for color. Silver and black makes for such a stunning mysterious color in a wolf, so that's what I went with.


Finished! (Photos by my husband, Mark.)


Posing with our German Shepherd Tala (her name is Sioux for "wolf").
Despite its shortcomings, I was proud of this piece for a first attempt. 

It sold within a week on Etsy and is now somewhere in Colorado, so I guess somebody thought it worthy! :) 

I'm eager to try another one when I get some time. Thanks for looking!

If you wish to keep track of my work or inquire about commissions, be sure to follow me on Facebook, Etsy or DeviantArt.

HAPPY SCULPTING!


Making Progress


I've really been trying to make some headway on my long list of commissions.

One if my goals this year was to work faster while still maintaining quality.

Like anything else, it just comes with practice.

It isn't easy with a very busy 2 1/2-year-old and other life demands, but somehow I'm making it work.

My biggest order so far this year is a collection of 12 custom rabbit figurines.

I'm excited to be halfway through! It has been such a rewarding project, and an even better learning experience!


I have a further backlog of commissions I haven't been able to get around to for awhile, but am slowly working my way through those as well.


I really took on more than I was ready for at the beginning, but my skills are beginning to catch up with demand.

Even though I am at such a demanding transition in my life (new-ish mother, small farm, house renovation, but move coming up later this year, etc.....), I really enjoy the diversion. 

It's been such a long time since I've allowed my creative side to take flight, and I like where it is going!


Saturday, June 18, 2016

Whale Shark Sculpture Process


One of my sculpting projects this past winter was a whale shark.

This was my first attempt at a shark of any kind. I was eager to give it a try, as the Whale Shark is one of my favorite sea creatures.

I didn't take very many pictures, unfortunately, so I'm not sure this can qualify for a true tutorial, but it may give you a few ideas or some inspiration.


I knew that this would be best approached by baking individual components before attaching them.

So I began with the basic body shape.


The ridges I added after baking the body. I rolled out thin snakes and attached them with liquid Sculpey. I used the edges of my fingers to smooth them into sharp ridges.


Next, I sculpted and attached the dorsal fins before baking again.


To create the upper tail fluke, I rolled and cut clay in the shape I wanted and then attached with liquid Sculpey and fresh clay. To create the curved shape, I propped him up in a bread pan using rolled up aluminum foil and pressed the fin up in the corner as it baked.


I used a similar process for attaching the bottom tail fluke. The pectoral fins I rolled, cut, shaped and baked before attaching and baking again.  I propped his body up on a roll of aluminum foil to keep the pectoral fins from warping in the oven.

My original intention was for him to be propped up on 3 fins, but the weight tipped him forward onto his chin and pectoral fins.


While it wasn't what I wanted, it ended up working just fine.

I sanded him down really well with fine grit wet/dry sandpaper before painting.


And that's that!

As always, feel free to post any questions in the comments section, and I hope this has helped inspire ideas for your next polymer clay project

HAPPY SCULPTING!